Today there are many options for converting colour and b&w negatives to positives that combine hardware and software. In contrast to now, when I embarked on this journey, there weren’t that many options at all.
While there are now alternatives for scanner software, most people either do lab scans, which can be expensive, or scan using a digital camera. Perhaps I’m a Luddite, but an iPhone is sufficient for my digital work, so I don’t have a digital camera. I just prefer film, after all that’s why I’m here…
As for scanning with a digital camera, see my 35mmc post pitfalls of scanning negs with a digital camera, which generated a fair bit of controversy at the time…
Here is my story.
The impetus
Years before, in Toronto Canada, when I took extension courses in photography at Ryerson University and at Sheridan College wet darkrooms were de rigeur. I even bought a Bessler enlarger but eschewed colour for the purity of the then more serious b&w. When returning in earnest to film photography in 2017, I took courses though the Extension program at UCLA (University of California Los Angeles). There, images had to be in digital form for class critiques.
Scanners and software were familiar territory to me, after having purchased a Canon scanner with Canoscan software for scanning documents. This made it logical to purchase a scanner for film negatives and positives. In 2017 when I started scanning film, digital cameras were expensive and not well-established while scanners were considerably less expensive, so I bought an Epson V550 scanner. Software was also a no-brainer, since Epson Scan was already included (free), and worth exploring.
The Epson scanner and software began the journey of refining methods of converting colour and b&w negatives into positives. Epson Scan software converts negatives and positives into standard formats (TIFF, JPG, PNG). I chose TIFF to retrain more information. As for the camera, it was a Nikon F3, a replacement for an old Nikon F.
Tweaking inverted images
After using the software to convert colour and b&w negs, I felt that it did not offer enough control, particularly with colour negs. The system did all the work, leaving me with little creative control – this resulted in me falling down the Rabbit Hole…
That was when I discovered a blog post by Alex Burke: Manual inversion of color negative film. This provided a method for reducing the orange colour cast in colour negative film. The trick is to remove the affect of the colour cast before inverting.
Of course, back then Adobe Photoshop was the software to use. To put it mildly, I did not – and still do not like – Adobe. I explored other options, concentrating on open-source (free) solutions for Mac OSX. I chose Gimp, an open source cross-platform software that provides features to modify colour and b&w images. Now Epson Scan could invert the negatives, output to TIF while Gimp could process the images.
Here are the steps:
Scanning negative and then inverting
- Include the film border (unexposed film base) in the scan.
- Scan colour at 32 bits and b/w at 16 bits.
- Output to TIF.
- Import the TIF scan into Gimp.
- Select part of the border.
- Pixellate the area to the max – basically smashing the area into a single, albeit, large « pixel »
- Make the colour the background colour
- Select → none
- Layer → New Layer
- Edit → Fill with background colour
- Set the layer mode to divide.
- Crop the image to exclude the border [film base]
- Layer → New from Visible.
- Invert Colors → Invert
- Make corrections for colour including Levels → Auto Levels → White balance. to improve the image.
Tony Warren describes stumbling on this process here
I gradually refined the last step, employing Alex Burke’s method to manipulate the curves in the main and RGB channels. In addition, I sometimes had to adjust the colour temperature, for example. for images in full sun. The human brain does this while film does not. So it was (and still continues to be) a work in progress.
Here were the steps for manual inversion steps (1 – 15).
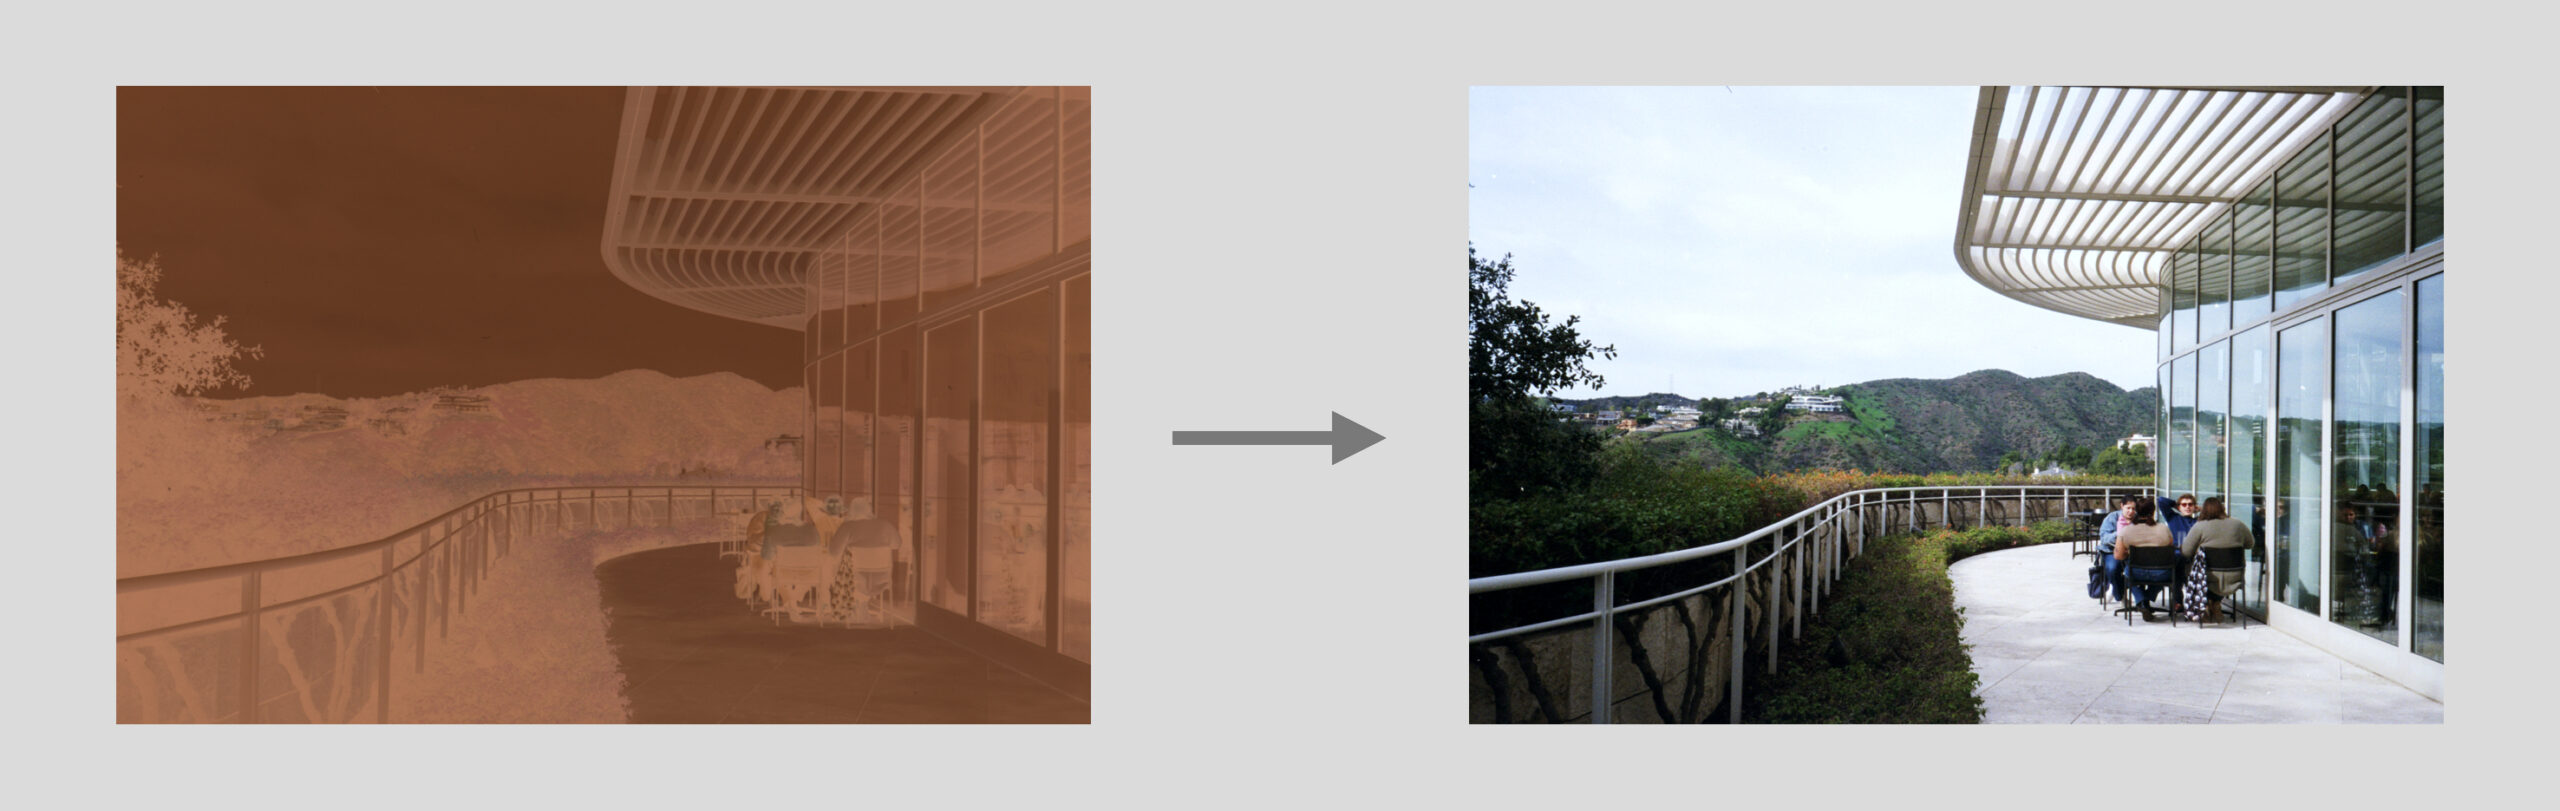
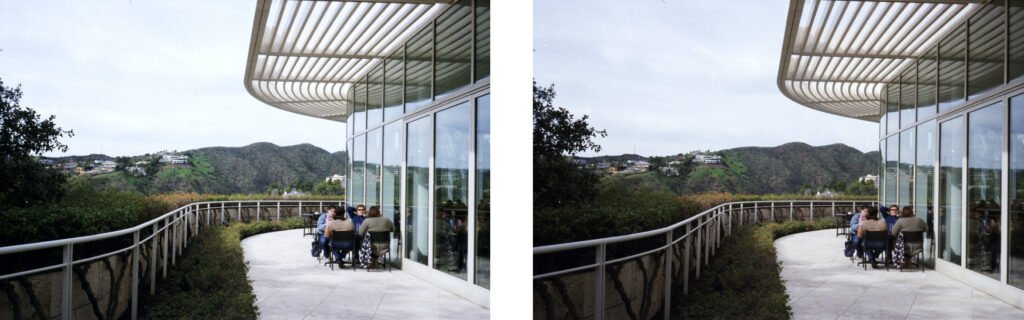
 These six images encapsulate the process. Moving from top to bottom and with each row from left to right:
Top row: steps 1 – 7 original negative with the film base cropped out after sampling for the base colour (started with TIF and progressed to DNG), then steps 8 – 13 reducing the orange cast and, step 14, inverting.
Bottom row: step 15 correcting for colour – auto-levels, correcting for colour temperature and using a gentle s-curve to darken the shadows and lighten the highlights.
The ongoing path
Not satisfied with the automagical transformation of the negative, I added software (Silverfast from Germany for Mac OSX and Windows). Yes, I bought the software, but it was worthwhile. A one time purchase, not through subscription (Adobe Photoshop for example). Silverfast offers an optional IR scan to remove dust from colour negs. Initially used the software to scan to TIF as positive..
While Silverfast can output RAW (DNG), Gimp could not read DNG files. This meant finding another open source cross-platform program to convert DNG to TIF. Rawtherapee did the trick
Film formats and neg holders
I began scanning 135 film from the Nikon F3 and then 120 film from a Rolleiflex 3,5f, both using film holders bundled with the scanner. Then 3d printed film scanning holders: one fior 135 with sprocket holds for 126 cameras (28mm square, printed at 26,5mm square) and 110 (16mm). I also used 3d printing to make other accessories.
Programs to convert negatives
You could, of course, think that this would be the end. But here are some more options for programs that invert film negatives: Darktable – open source and cross-platform, Filmlab (Mac OSX, Windows, Apple iOS and Android) and Chemvert (Mac OSX) from Chemlooks. And there are others, as well.
Both Filmlab and Chemvert have free demo versions. Chemvert inserts a Watermark while Filmlab restricts conversions to 36 images. You can buy either and just rent Filmlab at $7.99 US per month.
Now there are a plethora of options, making it difficult to decide. In some way, I am glad that I made the choices then and have refined them, and did not face at the beginning of this journey. See this article from Scientific American, entitled “The Tyranny of Choice” also known as the Paradox of Choice. Too many choices become paralysing. And even after choosing, there is the dreaded buyer’s remorse.
Current setup
Cut to the chase. The current setup is as an Epson V550 using Silverfast to scan to RAW (DNG) and convert from neg to positive. I then invert using Chemvert and further refine in Gimp to correct colour temp etc.
An aside
Colour is complex. As photographers we can only scratch the surface working with colour. For example, there are colourists for applying colour to black line drawings for comics as well as experts for doing colour separations for fine art prints and for ensuring colour accuracy. There are always tradeoffs. These require “the knowledge”. Don’t get me started on master printers.
Final thoughts
To sum up the issue of converting colour negs:
De gustibus est non disputandam. (Latin)
There is no accounting for taste
Chacune à son goût (French)
To each their own
Transforming a film neg into a positive is a complex problem. It really depends on the intention of the photographer and many more factors over which the photographer has little/no control. There are just too many variables: the photographer, camera and lens, environmental conditions, film, developer, developing process, scanning process and, lest we forget, the medium on which the image will ultimately be viewed such as photographic paper, projection, computer screen, shopping bag, t-shirt, etc. And that’s not including the viewing conditions (lighting, framing, matte, etc) and, just as importantly, the unique perception of the viewer – both physiological and psychological. Controlling all these aspects is a bit of an ask.
As such, it is my belief that converting film negs to positives is a complex task best addressed as an ongoing, evolving quest.
Share this post:


Comments
David Garcia on Converting Colour and B&W Film Negs – an Evolution
Comment posted: 07/02/2025
Comment posted: 07/02/2025
Gary Smith on Converting Colour and B&W Film Negs – an Evolution
Comment posted: 07/02/2025
Christopher Welch on Converting Colour and B&W Film Negs – an Evolution
Comment posted: 07/02/2025
Comment posted: 07/02/2025
Comment posted: 07/02/2025
Comment posted: 07/02/2025
Comment posted: 07/02/2025
Comment posted: 07/02/2025
Jeffery Luhn on Converting Colour and B&W Film Negs – an Evolution
Comment posted: 08/02/2025
Thanks for your simplified approach to the color negative conversion task. I don't normally shoot color film, but I started using C-41 chemistry to develop XP2 B&W film and on a lark, I shot a roll of Kodak color 35mm. My negs look good and sharp, but my conversions sucked. I'll follow your directions closely and see if I can get it right. Like many of us, I have loads of old color negatives that I've 'scanned' with a digital camera and your procedure will help me get good positives from those too. Thank you for your article! Jeffery
Comment posted: 08/02/2025
Martin on Converting Colour and B&W Film Negs – an Evolution
Comment posted: 08/02/2025
Comment posted: 08/02/2025
Thomas Wolstenholme on Converting Colour and B&W Film Negs – an Evolution
Comment posted: 08/02/2025
Comment posted: 08/02/2025
Alexander Seidler on Converting Colour and B&W Film Negs – an Evolution
Comment posted: 09/02/2025
Roger on Converting Colour and B&W Film Negs – an Evolution
Comment posted: 10/02/2025
Comment posted: 10/02/2025