There have been frequent mentions on this website about scans of negatives, ranging from professional labs to table-top models. I’m going to describe my experiences using a local lab, a high-end Nikon Coolscan 4000 machine, and an inexpensive homemade device. You choose which is best for your needs.
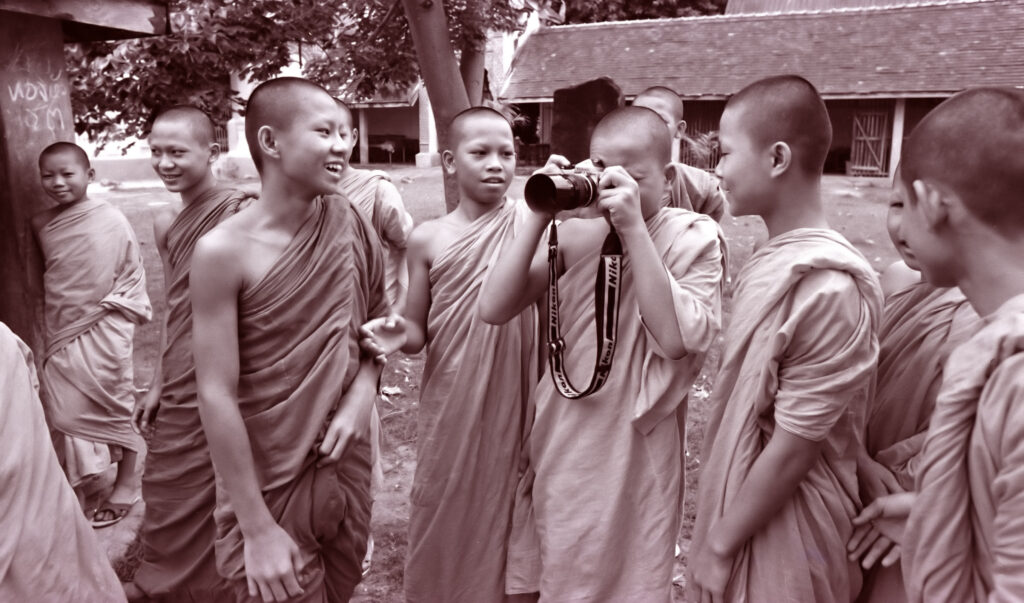
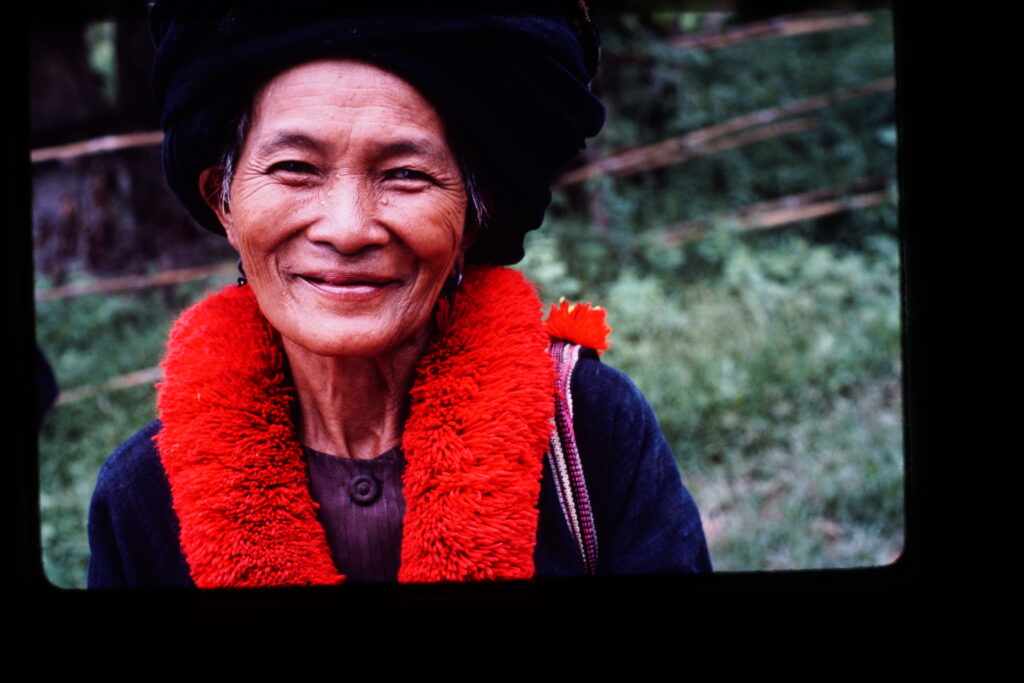
The photo below is from a 35mm shot on Plus-X from a happy memory of spending a month in a monastery in northern Thailand. The original negative was pretty good, but after scanning it got better through simple manipulation. Sharpening, contrast adjustment, and toning.
Let me begin by telling you about my motivation for scanning film materials in three words: Preservation, Manipulation, and Distribution.
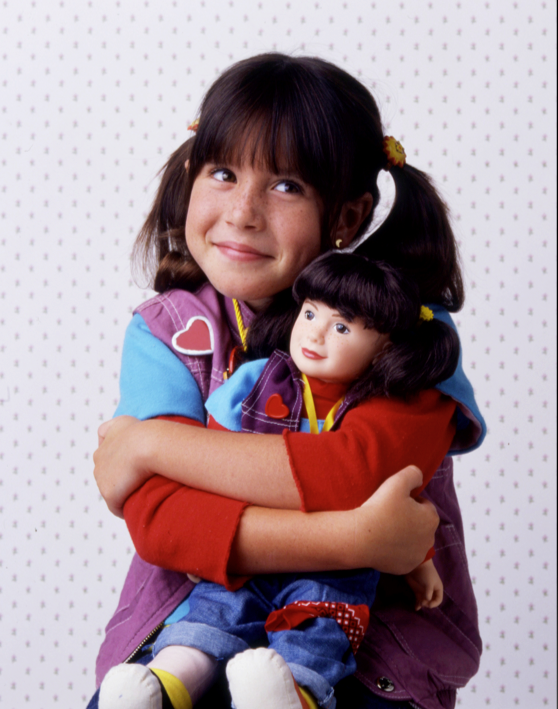
I’ve spent my life shooting professionally, beginning as a 17-year-old until I (mostly) retired two years ago at age 70. Making high quality photos for clients has been my main source of income since 1969. Across all those decades I’ve shot hectares of film and exposed billions of pixels. The majority of those images were important at the time, but relatively meaningless now: Product shots of electronic components, head shots of actors, long forgotten events, operating room footage, crime scenes, location shots of architecture, construction, apparel ads, travel articles, riots, military conflicts, political demonstrations, blah, blah, blah. There were, however, some fun commercial shoots that are worth remembering, like the session with a flash-in-the-pan child actress on the Punky Brewster TV show photographed with her look-alike doll.
Being the official photographer for the Marin Civic Center in 1976 was fun. The design by Frank Lloyd Wright was drawn in 1957, but the drawings sat in storage until the funds could be appropriated. Scanning my 4×5 transparencies allowed me to control the tones in ways that weren’t possible in 1976.

Having the Anne Klein company as a client was a challenge to come up with creative shots for each assignment, especially in pre-Photoshop film days. These lighting effects can be accomplished easier today with layers, but back then it was a one-shot challenge. No post production involved. This image is worth saving as a digital copy.

Has anyone anxiously asked to see those hundreds of thousands of commercial pictures? Not really. I just use them for my school lectures and lighting workshops. So why is preservation of arcane images a justifiable pursuit? Because between shooting commercial nonsense I found brief moments to shoot photos for myself. I regret not having taken more personal shots, but what I did produce is of great value to me. Mostly on film. That justifies the preservation part. The manipulation part is because there’s no photograph that cannot be improved by Photoshop. The distribution part of the equation is all about my legacy. I can’t possibly make enough framed prints to give to everybody that deserves them, but I can have collections of photos made into bound books. As an additional back up, I’m sending many people digital files. If my descendants know there are good pictures of them in digital folders, they’ll keep them and copy them onto whatever new technology comes along. Hopefully, in some future era, my prints and digital files will survive. Negatives will mean nothing to my descendants, but prints and books will endure. Everything else is just flickering electrons that may one day be cold, dark, and dead.
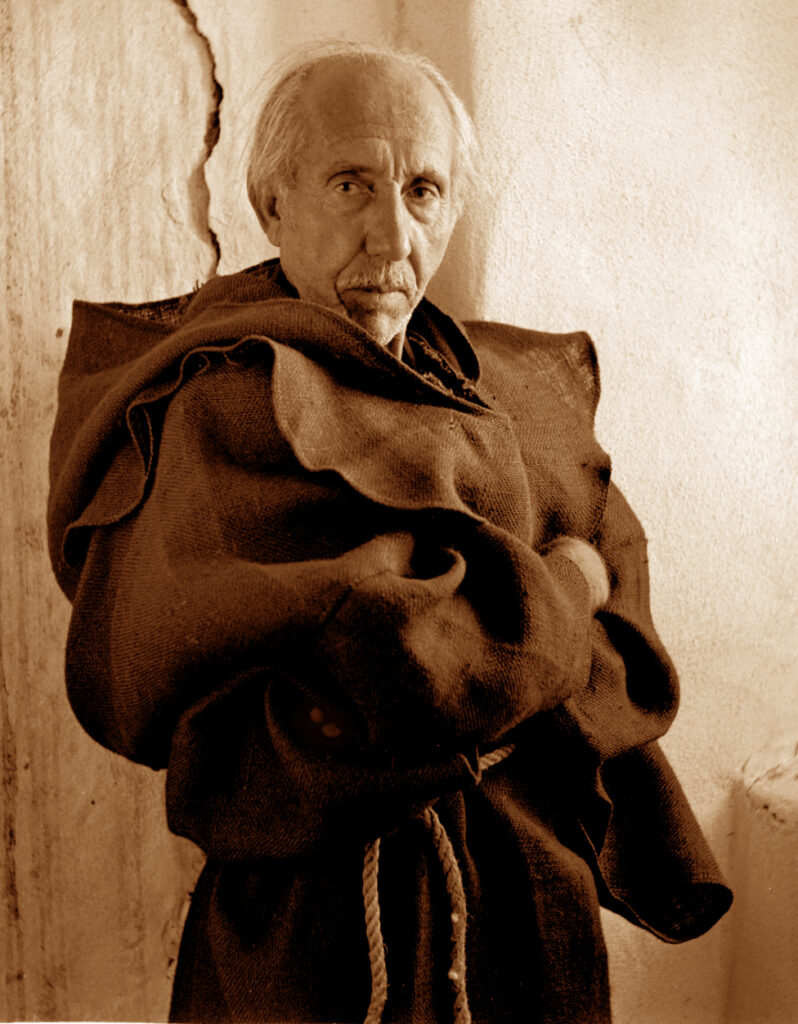
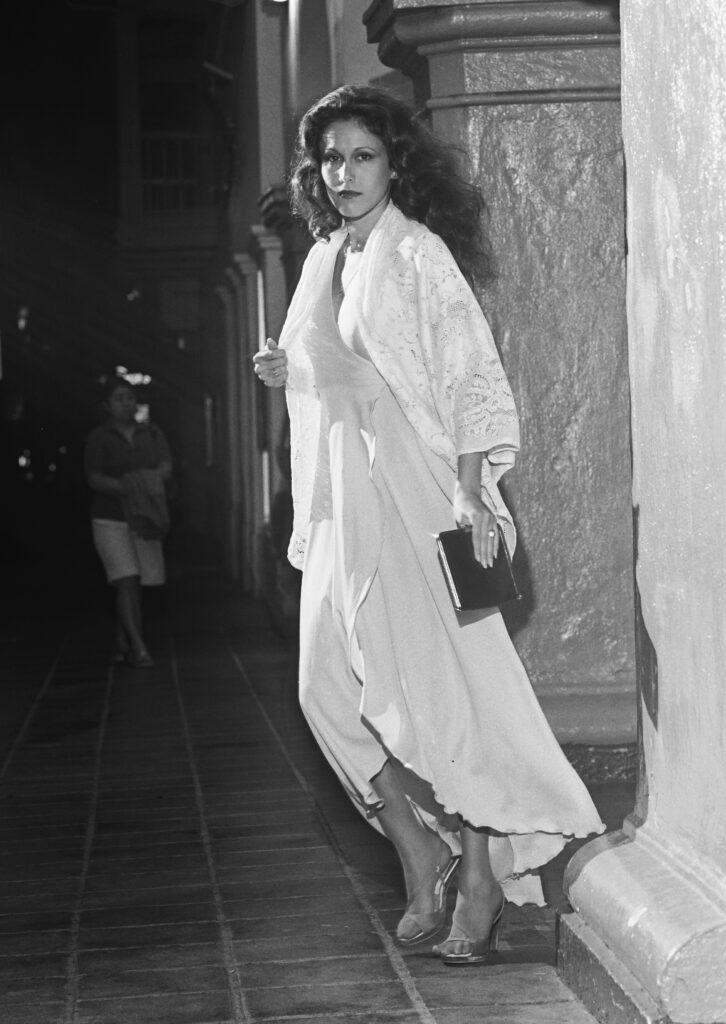
This photo of Rafael Gutierrez, my guitar and painting mentor, reminds me of all the times I used him as a photo model. This was a photo for Iberia Airlines. Don’t tell anyone we took the shot at a Mission in Fremont, CA.
Enough of the emotional drivel. Let’s get on with comparing my methods and results. Almost everything I’ve shot commercially has been scanned for reproduction. Sometimes it was made into halftone newspaper or magazine printing plates and more recently used for websites. The methods of scanning pre-1995 were the domain of commercial engravers and printing houses. Now anyone can and should scan and print their own stuff.
My first scanner was a Nikon Coolscan 4000. I bought it with Wayne, a Brooks Institute schoolmate. We purchased it used on Ebay in 2010 for $1500. I had about 14,000 35mm slides and negatives to scan and seven hundred 2 ¼ transparencies and B&W frames. The Coolscan 4000 had well designed film carriers and onboard software to remove dust, minimize scratches, and adjust color/contrast/exposure. The drawback was the time it took to scan each image, which was about 7 seconds. This was a software issue that has been improved. The old Nikon scanners with updated software can scan a frame in 1.5 seconds.

After buying the Nikon scanner I hired a friend, Barry, to assist me. He had no previous experience, but learned quickly. We got through my film library in five 10-hour days. I prepared the film, throwing away about half of everything that wasn’t worth saving. My figure of 14,000 describes the images I kept! We plowed through 15 boxes filled with nearly 30,000 images!
I gave Barry the file names and we shared the task of blowing off the dust. He earned $20 an hour, which was a bargain for me. The scans were better than any lab I’ve ever used. When we finished scanning, I delivered the machine to Wayne, the co-owner. He still uses it for himself and commercial clients. In my opinion, it yielded the best scans I’ve ever seen. What are Nikon 4000 scanners selling for now? Between $600 and $1500. Imagine that! What a deal!
After retiring from commercial shooting, I continued teaching college photo classes, which I’ve done since 1981. But things have changed. I started teaching a B&W film class last year, in addition to digital. I was seriously bitten by the film bug again. Obsessively so! My best images get printed, but I also want to scan many to allow post-processing manipulation. I could send negatives to Wayne, but it would be a burden because I shoot a couple rolls of film a week. Additionally, the Coolscan 4000 can’t handle 4”x5” format. You’ll need a Coolscan 8000 for that.
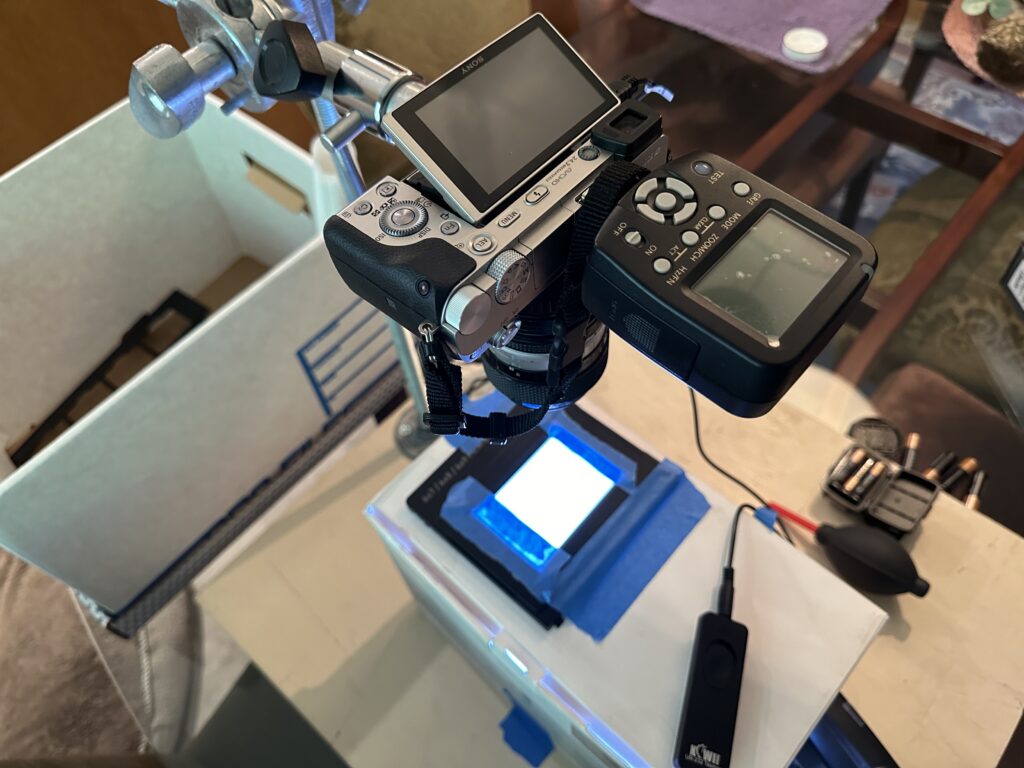
So, it was time to buy another scanner because I didn’t want to pay for mediocre scans from a lab. I tested several inexpensive devices and frankly, they were rubbish. I won’t list product names here. I figured I’d have to buy an expensive scanner or build something. My solution is a simple rig using two old cameras. The Nikon D-610 and a Sony A6000 both use very old 55mm and 105mm Nikkor macro lenses. These macro lenses have a very flat field of view and are available for under $100 each on Ebay. For 35mm scans I must use an extension tube for 1:1 magnification. The color results aren’t nearly as good as the Coolscan 4000, but the B&W scans are suitable for printing 11x14s.
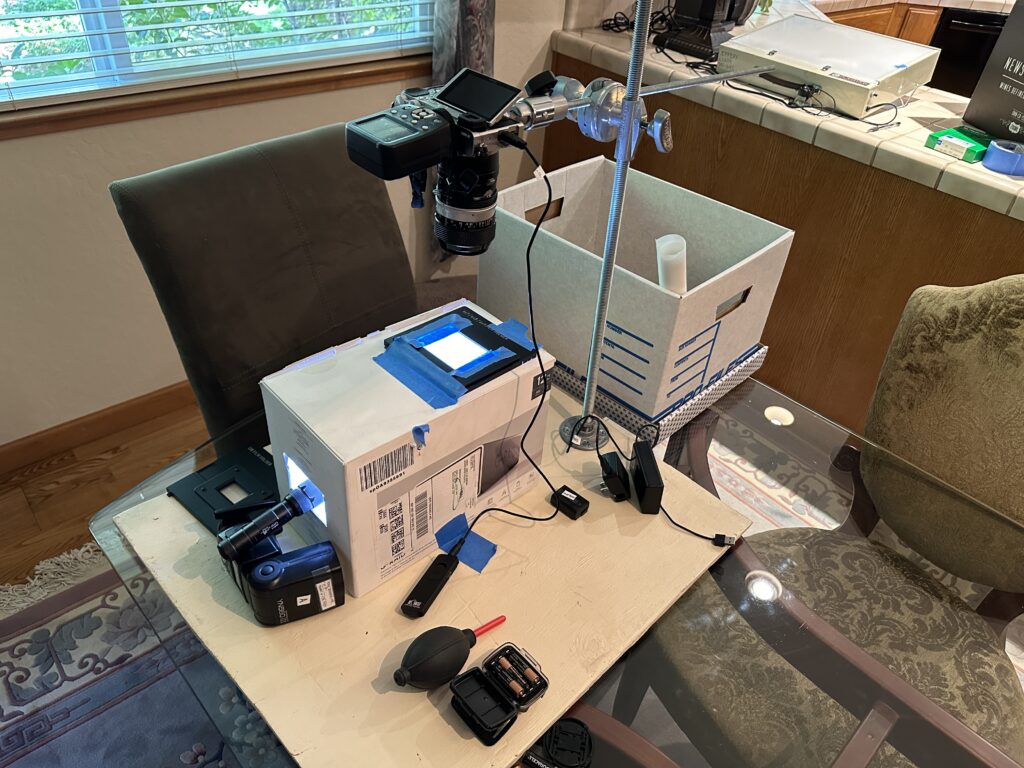
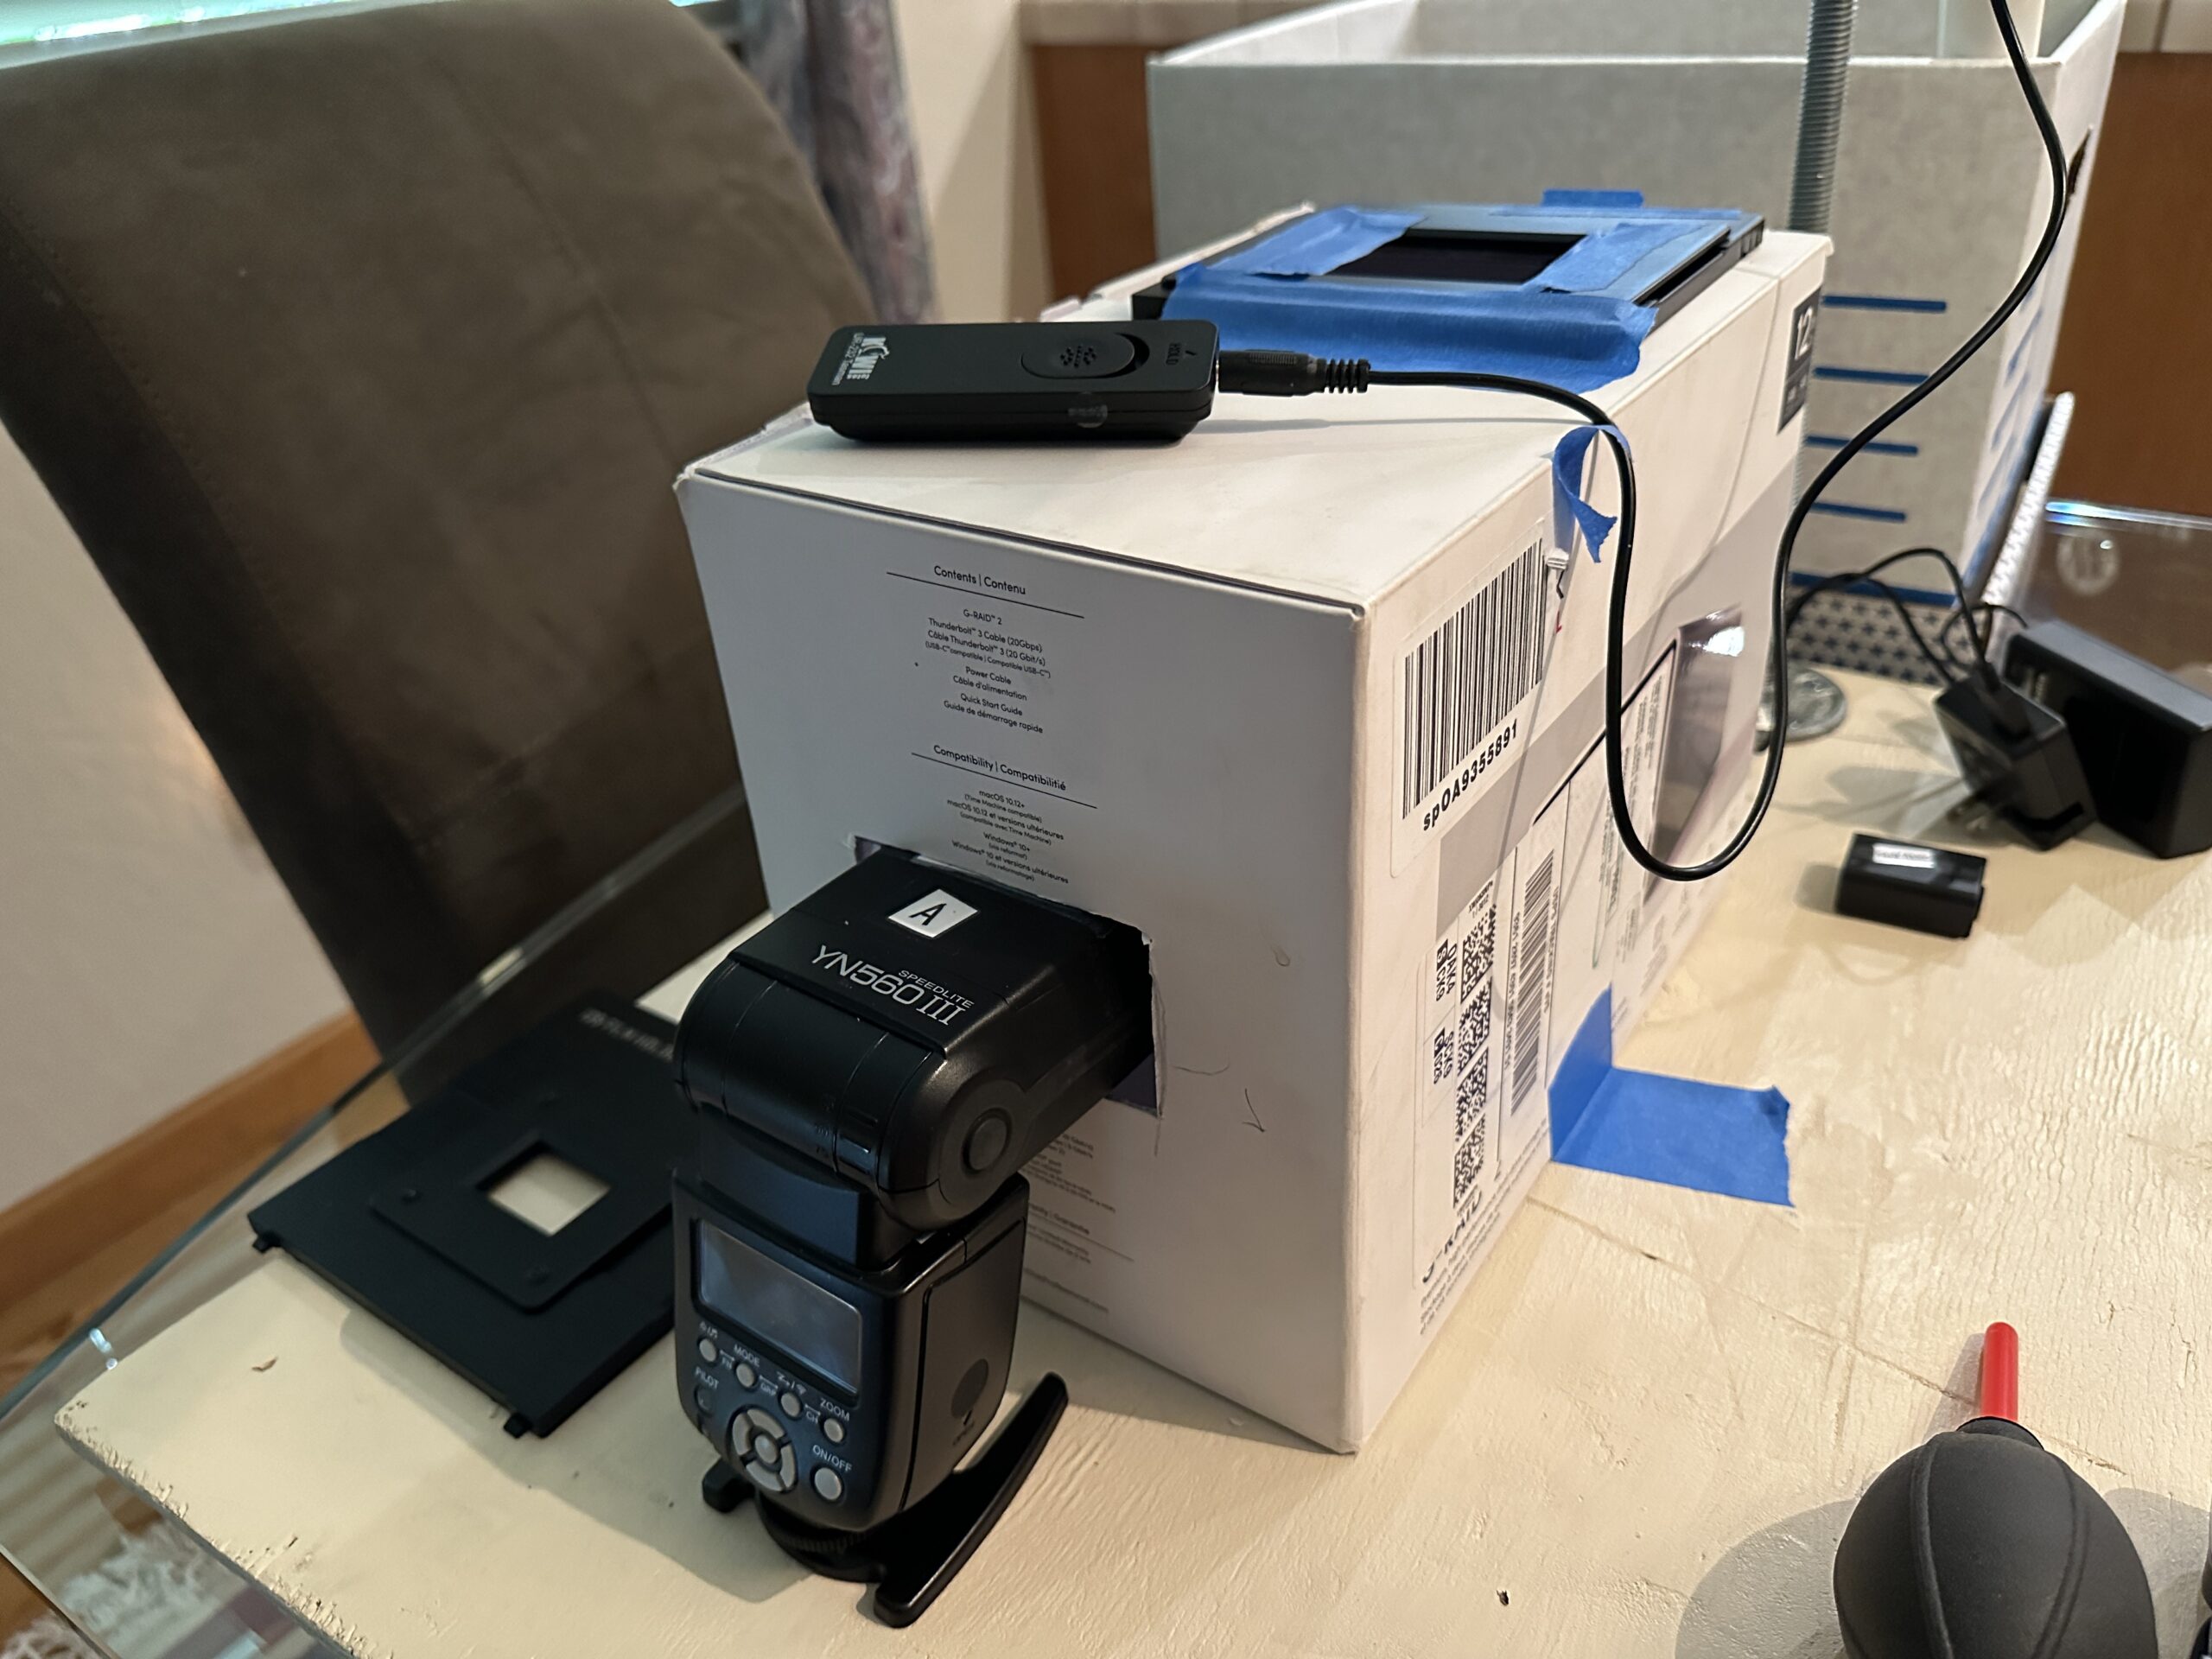
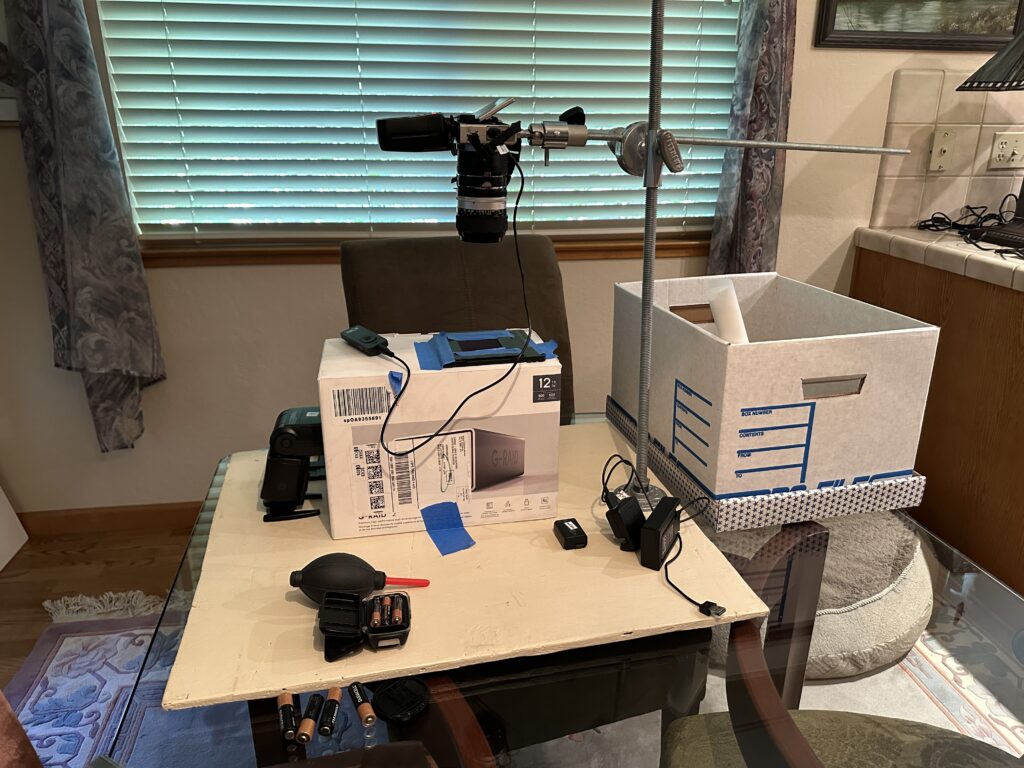
As you can see in the photos, my rig looks like a DIY copy stand, because it is. The plywood baseboard came from the trash pile of a local construction site. The item used to grip the vertical standard is a Matthews device, and the universal joint holding the camera came off a monopod. Both parts were bought at photo garage sales for about $10 each. The ‘all-thread’ rod pieces had to be bought new for at total of $18. The vertical all-thread post screws into a plumbing fitting costing $3. It’s realistic to assume this part of the rig should cost between $50-$80 if everything is purchased new. Notice the flashlight used for focusing. Once the rig is focused and locked down, no further focusing is needed. You don’t need the aforementioned parts to get good results, but the copy stand components make the task easier. What? You don’t need a copy stand? No. Read further.
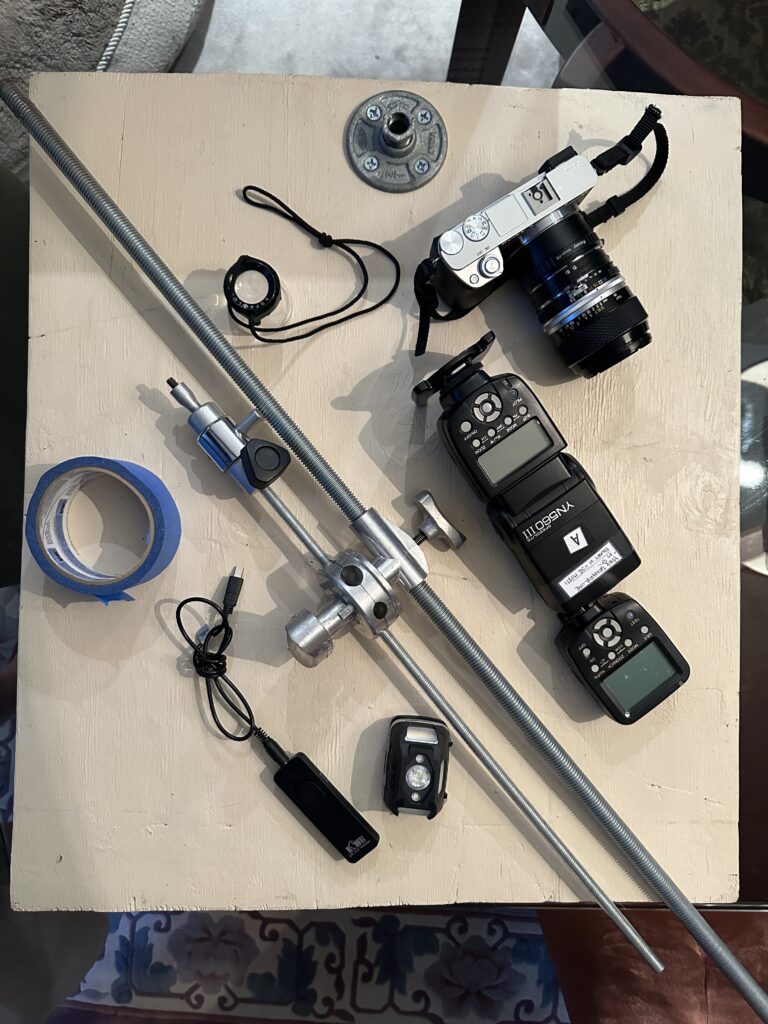
The most important parts of the rig are the strobe light source, the mixing chamber, and the film carriers. When I was experimenting with making good digital copies of negatives, I did my original tests with a handheld camera. How does that work? Easily. A battery powered strobe on a low output setting, like 1/64 power, has a flash duration as quick as 1/40,000 of a second. For handheld exposures, use a white piece of cardboard positioned at a 45 degree angle behind the negative. Bounce the light through the negative and you’ve got a sharp copy. I set the camera at 1/125th at f/11 to eliminate any ambient reflection from the film. Anyone can handhold a camera and get tack sharp results at an effective exposure of 1/40,000th! I use a Pocket Wizard radio trigger to synch the strobe with the camera. For convenience I now put the camera on my copy stand and fire it with a cable release, but with strobe, carefully pressing shutter release or using a self timer also works fine. Locking up the mirror on DSLRs is not necessary.
Now is a good time to explain that strobes don’t really go up and down in power. Flash units fire at full power on every burst, i.e the same electrical shock voltage is delivered to the xenon/argon tube every time. The flash duration, however, changes to increase or decrease the exposure. Full power on battery powered strobes is as slow as 1/1000th of a second. That’s a long burn time for strobe, allowing the light to accumulate on your sensor/film. You don’t want a long burn time because you don’t need that much light for copy work. The strobe used in my rig has a duration of 1/80,000th of a second at the 1/128th output setting. So, the copy stand apparatus is for convenience and consistency, but not absolutely necessary. If you’re only doing a roll once in a while, you can just tape your negatives to a piece of cardboard with a cutout and fire a flash into a white reflector behind the film. You’ll be amazed at how sharp a flash exposure will be. Constant light sources don’t produce a fraction of the sharpness of a strobe. Additionally, you won’t have to lock up your mirror for stability because the effective exposure will not be affected by minor camera shake. This set up is in California where we get some kind of earthquake every week. No worries with a flash duration of 1/80,000th of a second!
Let’s move on to the design of the light mixing chamber, which is critical if even illumination is to be achieved. I used a sturdy cardboard box that was the shipping carton for a hard drive. It happened to be white inside, but any cardboard box can be lined with typing paper to achieve a clean white reflection of the strobe. The strobe hits a white reflector at a 45 degree inside the box and the soft light bounces up through the film. I plan to make a larger wooden mixing chamber in the future because this particular cardboard box isn’t big enough to form a big even circle of illumination for 4×5 negatives. I did put a diffusion baffle inside the box to improve the problem, but a slight hot spot of about 1/2 of stop on my big negatives is evident. Conclusion: Bigger mixing chambers are better.
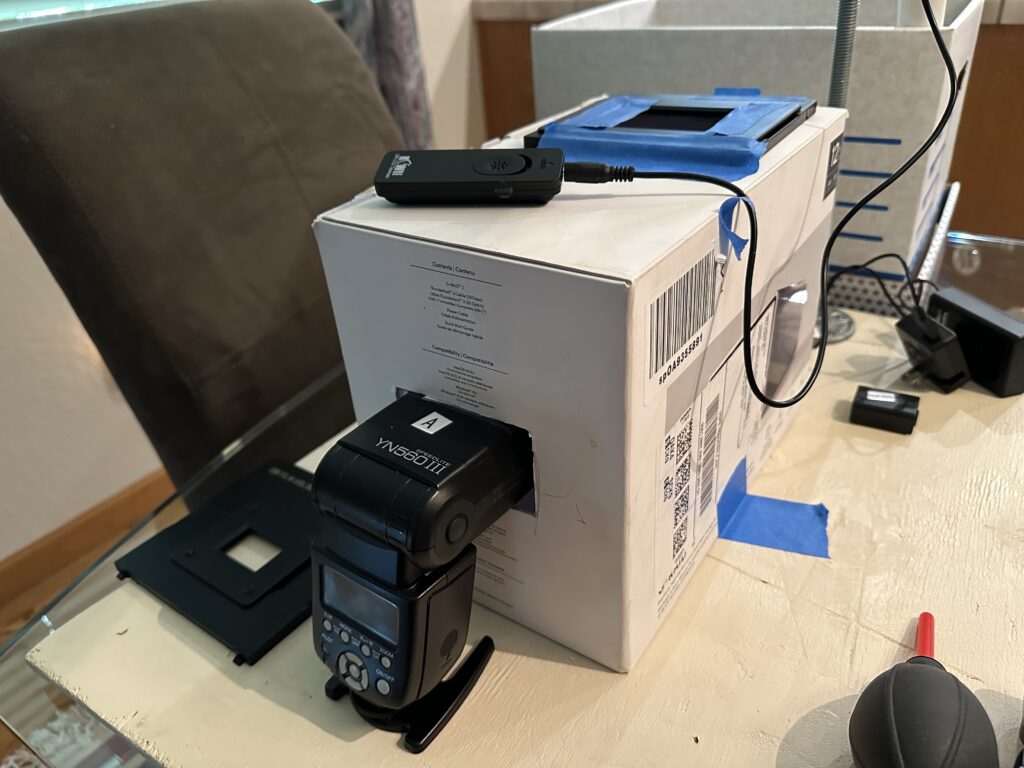
Proper negative carriers are also a matter of convenience. I began my tests using negative carriers from my enlarger, but they don’t allow for non-abrasive contact as you scoot the film from one frame to another. I found plastic negative carriers on AliExpress for $18 each. That seemed expensive for a simple plastic sandwich with a square cut-out, but they are worth it because only the edge of the film touches the carrier. Being able to easily slide the film from one frame to another saves time and eliminates abrasions. When ordering these be aware that the photo shows all the sizes in a photo with a light box. I only received one carrier with my order. The others had to be ordered separately. The light box is good for examining film, but as I mentioned, strobe is king for sharpness.

Let’s look at my results using the Nikon Coolscan and the cheap rig. As previously mentioned, I use 1970s vintage Nikkor macro lenses on both a Sony A6000 body and a Nikon D-610. In sharpness, I believe the Coolscan edges out the macro lenses, but only by a little bit. The sensor in the Coolscan makes the biggest difference with color. The Coolscan has remarkable color fidelity, and the ICE software automatically removes dust and scratches with very little loss of sharpness. The Sony A6000 color fidelity was positively awful. The Nikon D-610 was much better than Sony, but still lacking. When I shot the Nikon in RAW, I was able to get good results in post-production, but it takes time to dial the color in.
Sony color copy of a Kodachrome slide shown here has no subtle rendition of reds. No amount of post processing delivered a good result. Maybe newer Sonys are better.
Nikon D-610 color copy is much improved. File size 8MB. This image had to be brightened, but that can be done while shooting.

The Nikon Coolscan is the best rendition of color and contrast. File size 21MB

The cheap rig shown in this article is used 99% of the time for B&W negatives, and it compares favorably with the Coolscan 4000. It’s quite a bit better than the scans I’ve gotten at two local labs. In summary, making your own ‘scanner’ isn’t really a scanner at all. It’s a way to make sharp digital copies of your negatives, and in that role it is a great performer.
Photo below of Yana Noori modeling a Dior outfit was shot in 35mm Tmax pushed to 1200 processed in HC-110. A grainy image.
Close up portion of the Yana Noori shot (equal to a 16×20 size print) shows the sharpness obtained by the DIY rig. Much better than what I got at two local labs.
Share this post:


Comments
Bill Brown on How I achieve Good scans with a DIY rig
Comment posted: 22/09/2024
All that to say I'm also looking at whatever methods will help me digitize my negs and prints. I started several years back getting my archive in date order. It's not perfect yet but it is useable and much easier to locate work from specific time frames. I too have envelopes labeled and in bins. I also began the task of writing stories to go along with specific bodies of work. My biggest to date is a 40+ pages handwritten story of my 1979 motorcycle tour across the American west, up into the Canadian Rockies then across the northern U.S. to my parents home in Indiana. From there I drove down through the Smoky Mountains and back to my home in Dallas. All told I covered just shy of 8,000 miles. My log book shows that I spent $17 on food over the month I was on the road! I recently finished another story about a trip to Bogota, Colombia in February of 1992. I too want to create a series of digital books for my family and friends but as of now any kind of retirement is still somewhere in the future.
I do want to continue chipping away at the task of getting everything in a digital form so this article presents a method to consider. Honestly, I'm glad my work is on 35mm and 2 1/4 because the scans that can be pulled have more resolution than those early digital cameras and phones that so many people moved to. Thanks for the research and story. I was just wondering why you didn't use an old bed scanner box for your rig?
Comment posted: 22/09/2024
Richard on How I achieve Good scans with a DIY rig
Comment posted: 22/09/2024
Comment posted: 22/09/2024
Gary Smith on How I achieve Good scans with a DIY rig
Comment posted: 22/09/2024
Leonel LeyCar on How I achieve Good scans with a DIY rig
Comment posted: 23/09/2024
Revisaré con cuidado la forma en que lo construiste por que mi Scaner Epson ya está al fin de su vida útil y veo que obtuviste muy buenos resultados...
Gracias por compartir tus conocimientos y tus experiencias.
Alexander Seidler on How I achieve Good scans with a DIY rig
Comment posted: 23/09/2024
Paul Quellin on How I achieve Good scans with a DIY rig
Comment posted: 25/09/2024