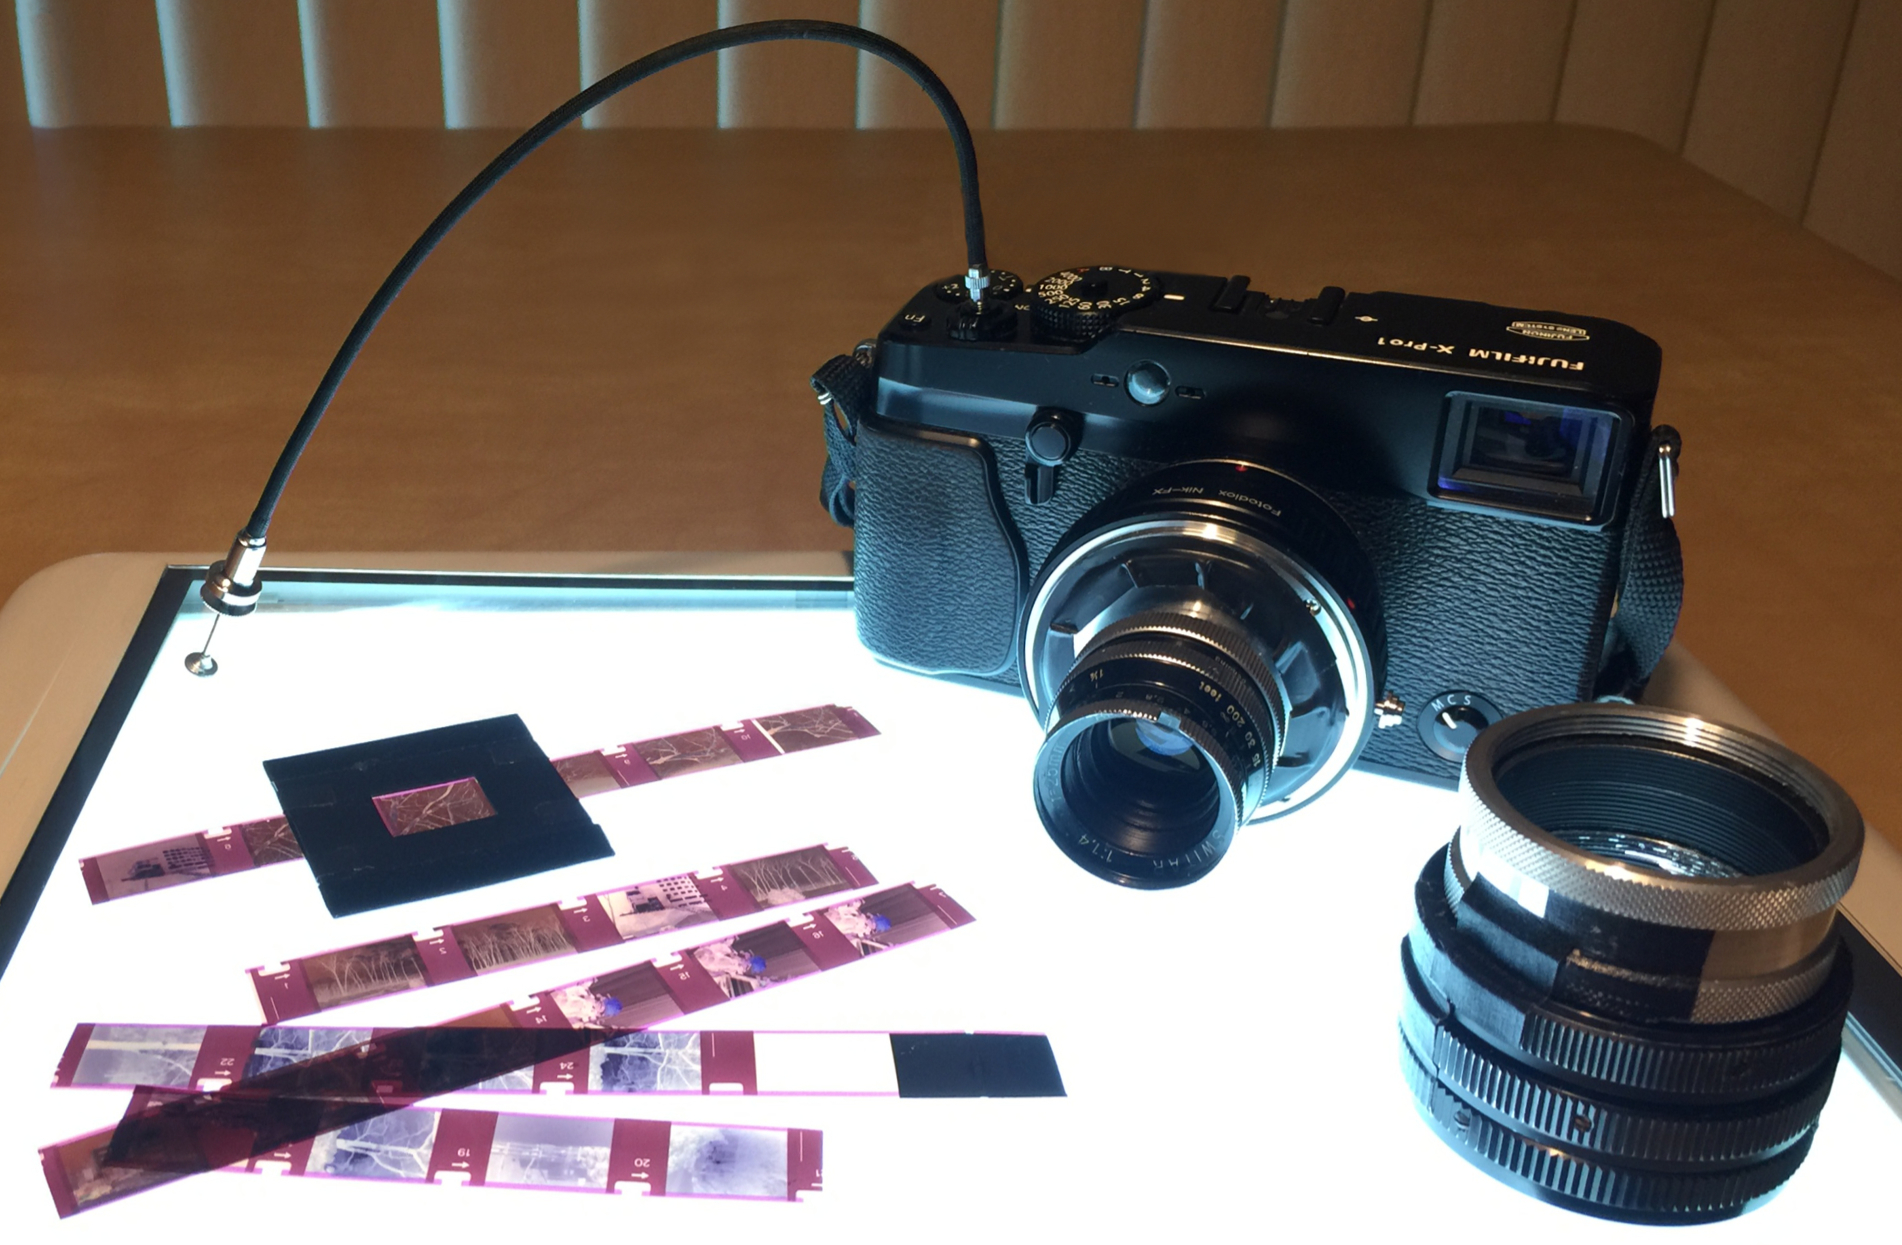
In a previous article, I explored macro-photography using C-mount cine lenses attached to a Fiji X-Pro1 APS-C digital. In those three experiments, I discovered that my mounting technique– screwing a 16mm movie-camera lens into a C-to-T adapter disc, screwing them into a T-to-X adapter tube, and then mounting the combo onto the X-Pro1– produced macro images that were bigger than the camera’s 16MP sensor.
It wasn’t an issue in those experiments. But it would be in this fourth– and perhaps most interesting and useful– macro project:
Scanning 110 (or 16mm) Negatives
With the magnification I achieved earlier, I thought C-mount lenses might prove useful for digitizing “subminiature” films like 16mm and 110. But since I don’t yet shoot 16mm, I decided to try 110 negs. They are 13x17mm in size, and my C-mount lenses’ 2x-magnification would produce 26x34mm “scans.” But the X-Pro1 sensor measures 15.6×23.6mm. So nearly 10mm of each 110 scan would miss the sensor both horizontally and vertically. 2x was just too much.
But the problem was easily solved.
Pulling the Lens In
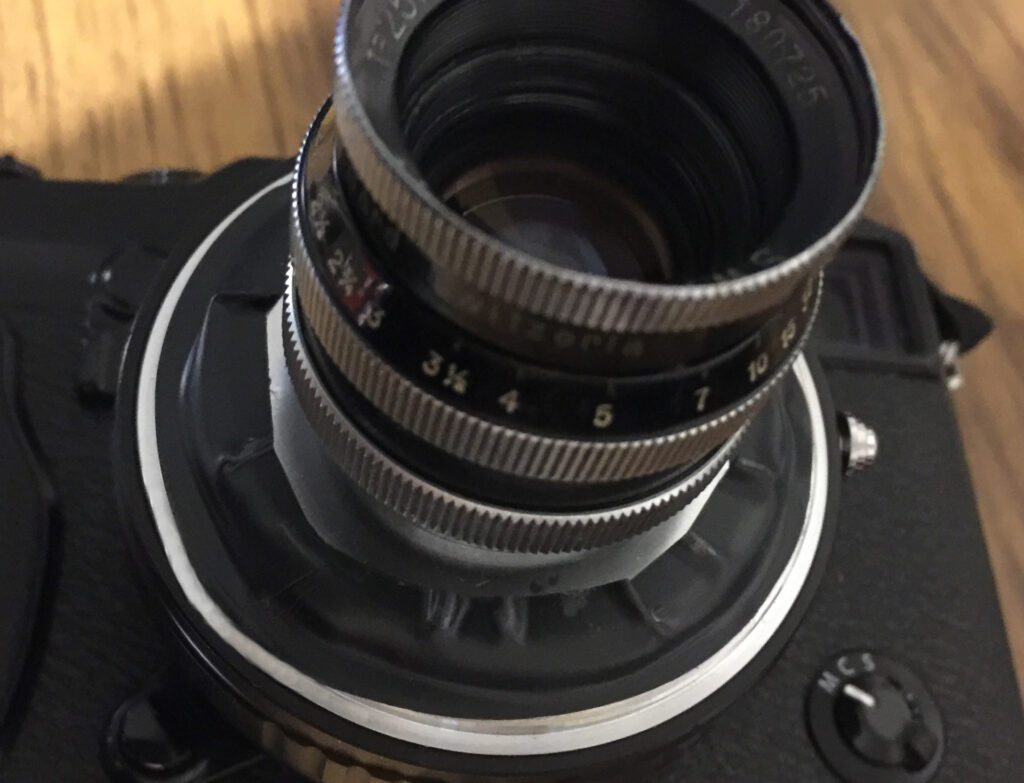
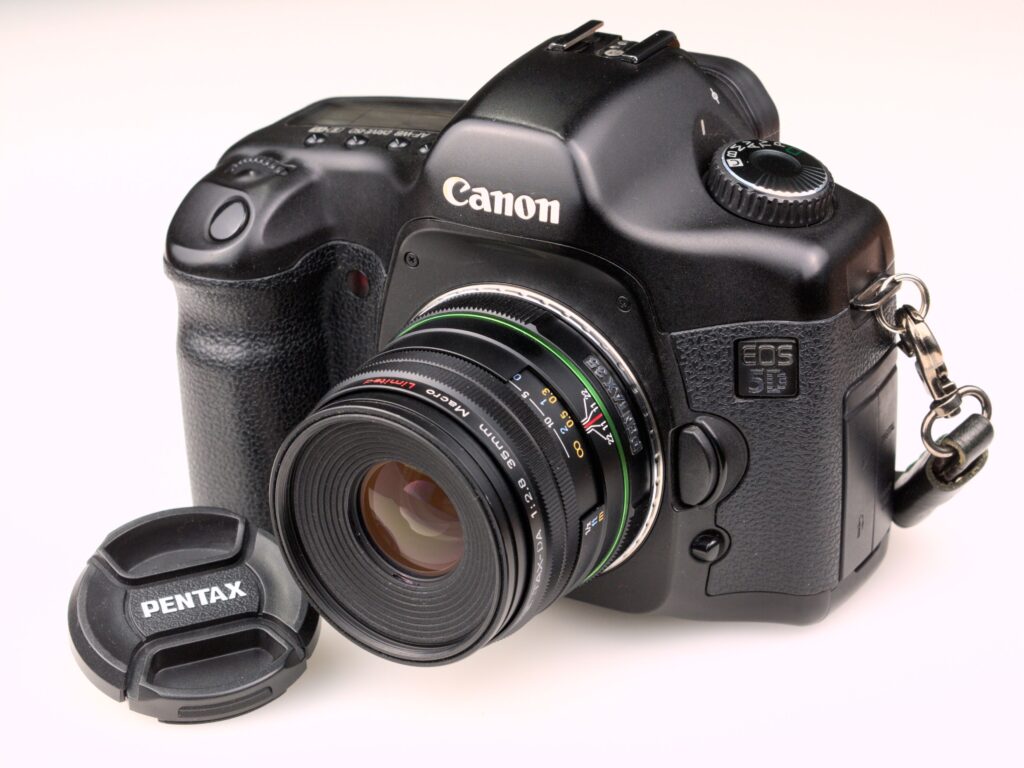
The T-mount adapter I used before was obviously too long for this scanning application. By way of background, the original design brief for T-mount lenses was that they had to achieve infinity focus with practically every SLR system available at the time. To pull that off, they had to have a longer flange-to-film distance than any camera body to which they would be attached. And my T-to-X lens adapter is indeed longer than any of the others. In fact, it’s a whole centimeter longer than my Nikon-to-X adapter… and Nikon’s “flange” distance may have been the longest in the 35mm realm. (Though the more compact Olympus SLRs almost matched it!)
So as the next shortest adapter in my collection, the Nikon-to-X tube would hopefully:
- Bring the C-mount lens closer to the camera
- Reduce the lens’s macro magnification and
- Put more of each 110 image onto the X-Pro1 sensor
As before, I screwed my best C-mount lens (the Kern-Paillard Switar AR 25mm f/1.4) into the C-to-T adapter disc. But unlike before, I could not screw the combo into the Nikon-to-X bayonet adapter. Instead, I used a narrow strip of thick, double-sided, mounting tape to strongly (but reversibly) adhere the disc to the Nikon-to-X adapter. I then taped over this join with electrical tape to block some light that still leaked through (as shown here):
Then I did two quick test “scans” of an old 110 negative shot in Rome:

The result on the left was with the lens attached to the longer T-to-X adapter while the one on the right was with the shorter Nikon-to-X. A noticeable difference! The Nikon-to-X adapter almost exactly captured the entire 110 frame.
DIYing a Focusing Helicoid
Because I’d be shooting flat subjects, and with C-mount lenses’ minuscule macro depth-of field, it was crucial to:
• Maintain parallelism between 110 negatives and the camera sensor,
• Perform fine focusing without the benefit of a specialized macro-focus rail, and
• Steady the camera during long exposures
Hand-holding was out. And a novel solution was only possible because C-mount lenses are so darned small! In effect, I created an external version of the focusing helicoids that are found inside many lenses.
Over years of yard sales, I’d collected quite a few 35mm lens adapters and extension tubes. And by trial and error, I found that five of them combined into an external helicoid that worked. Shown below (from top to bottom), it consists of two chrome T-mount extension tubes, two black Pentax M42 screwmount extension tubes, and one Pentax M42-to-T-mount lens adapter:
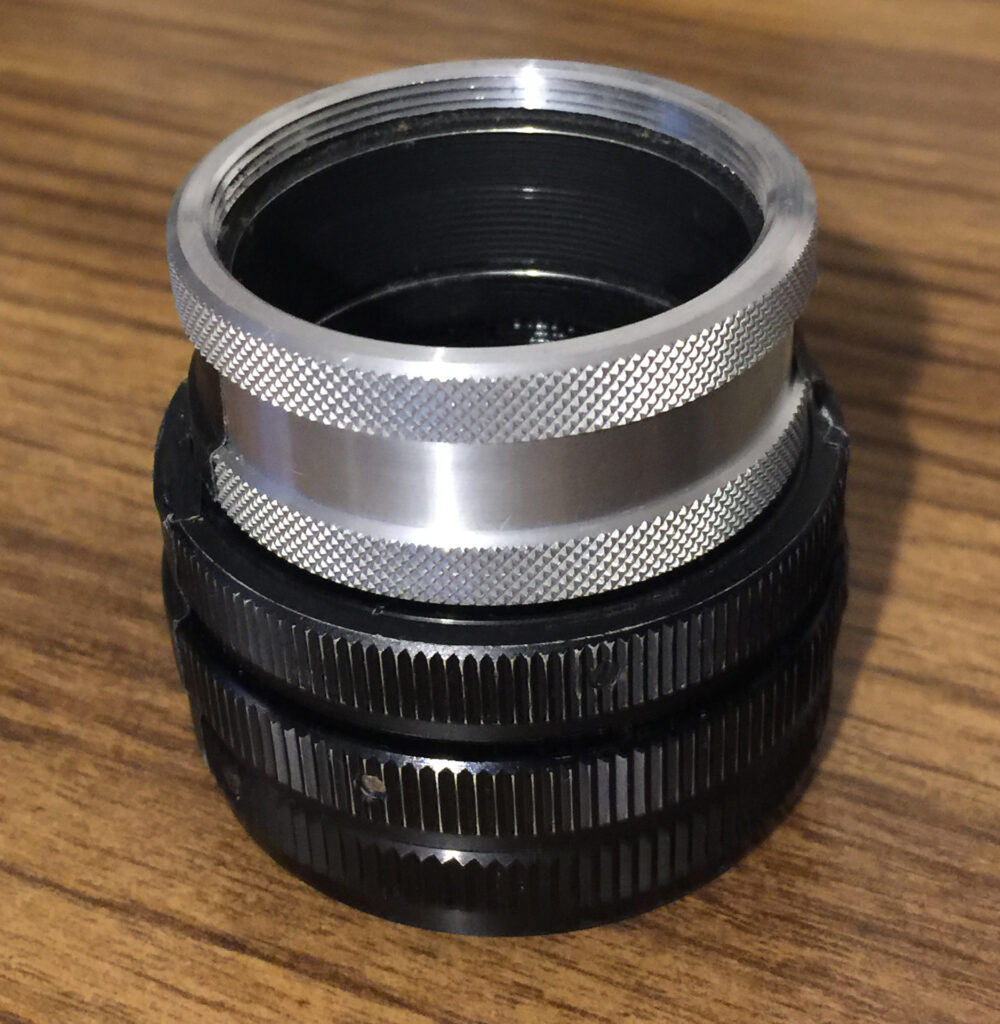
By an amazing coincidence, this mixed assemblage was also largely necessary. Oriented as shown (with the chrome tubes at top), it allowed the Switar lens to slip fully into the helicoid. But if the helicoid was inverted, the lens jammed partway in. This is because (1) the chrome tubes– which in use will rest up against the face of the Nikon-to-X adapter– have slightly thinner walls (and wider interior cavities) than the black tubes AND (2) my Switar lens is similarly wider near the camera. So with the helicoid used as above, it fit like a glove. But not the other way around.
Negative/sensor parallelism and camera shake are also well controlled since the camera front will rest solidly on top of the the helicoid.
NOTE: Though this motley mix worked, one must be careful when screwing M42- and T-mount tubes together. They both have 42mm thread diameters, but different thread pitches. So they will partially screw together, but don’t over-tighten them!
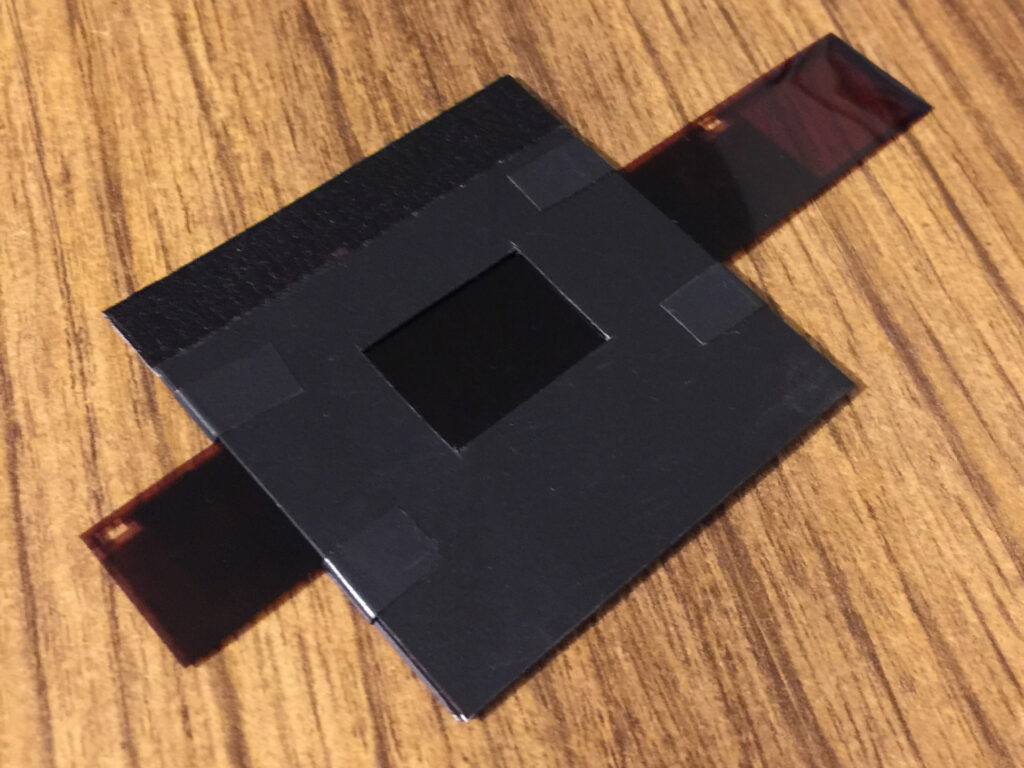
Crafting a Negative Carrier
I next improvised a “carrier” to:
- Firmly hold 110/16mm negatives,
- Allow only light passing through an image to reach the camera
- Flatten “cupping” of negative strips, and
- Keep negatives from touching the light-table (to prevent Newton Rings in the scans):
To make it, I cut windows in two 2.5-inch squares of stiff plastic sheet (harvested from the back of an ordinary report binder):
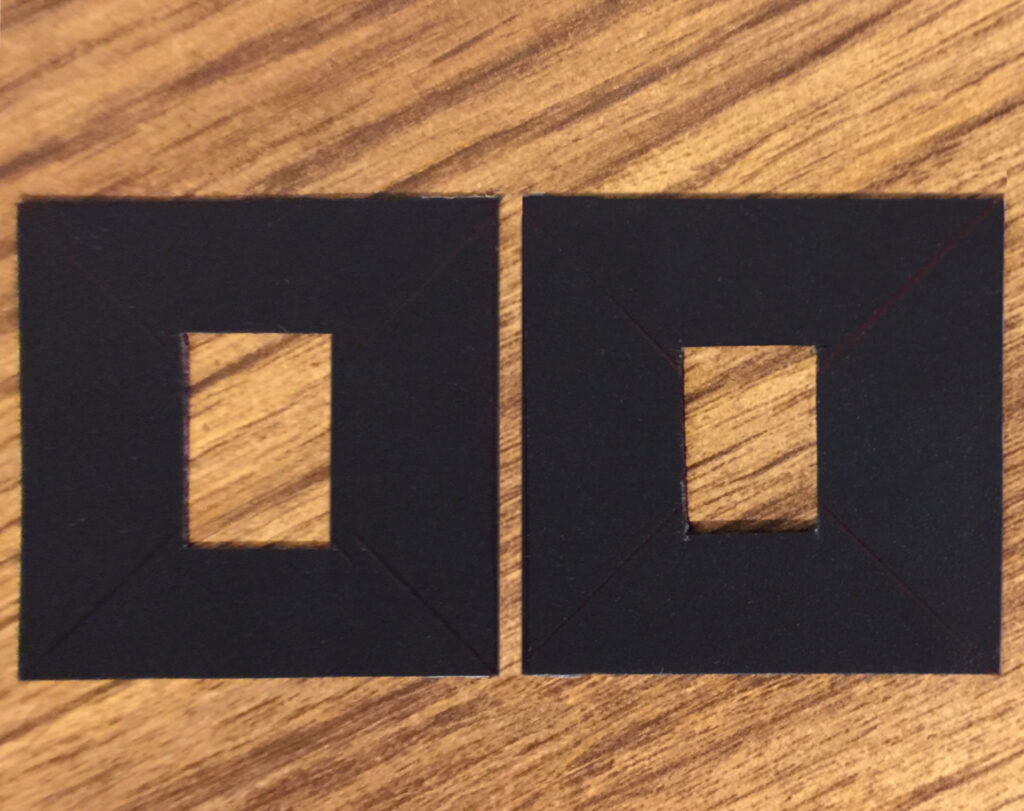
The window on the right (in what will be the carrier’s top layer) exactly matches the 13x17mm 110 negative size. But the window on the left (in the carrier’s bottom layer) is 13x21mm in size. This wider hole produced little “ledges” in the carrier that made it easier to slide negatives through and past the window openings. (If you try it, you’ll see what I mean!)
I then taped the squares’ top and bottom edges together, slid a 110 negative strip between the squares (an easier process if you slip a corner in first), precisely positioned an image in the carrier’s top window, and wrapped small strips of tape around the frame’s sides just above and below the negatives. This created upper and lower “guides” for the carrier’s “strip channel”:
And here’s the complete scanning setup:
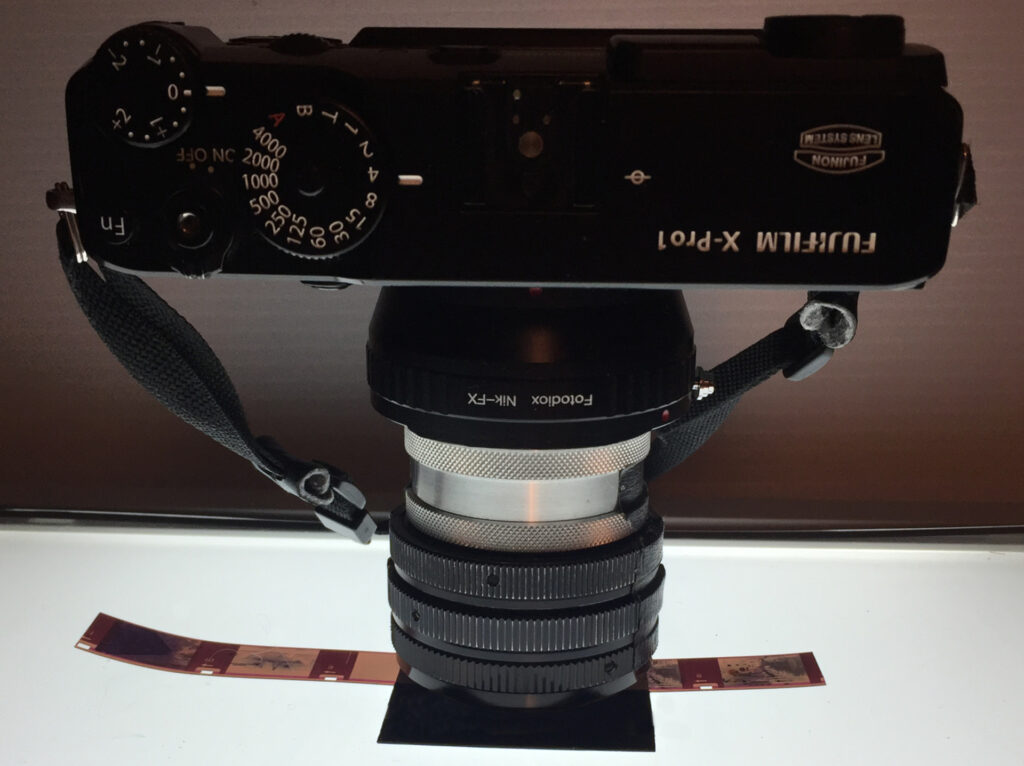
The focusing helicoid is centered over a negative, and the camera and lens are lowered into the helicoid. But, one final step was needed before doing scans:
Calibrating the Helicoid
I used strips of gaffer’s tape to lock the helicoid’s five tubes into two separate units– a 2-tube “chrome” unit and a 3-tube “black” one. To make it easier to achieve fine focus, I put a drop of very light machine oil in the grooves inside the top of the black unit and worked them around using the threads at the bottom of the chrome unit. TIP: The “foil”-lubrication oil that came with my electric razor worked beautifully!
Then to calibrate the helicoid, I:
- Found a 110 negative that– through a loupe– looked well-focused.
- Slipped the image’s strip (emulsion side up) into the carrier’s strip channel,
- Put the carrier on my light table, turned it on, and centered the chosen image in the carrier’s top (13x17mm) window,
- Swept dust off both sides of the negative (and the light table under the carrier) with a soft camel-hair brush. NOTE: I did this before every 110 scan.
- Placed the helicoid over the carrier,
- Lowered the camera – lens-first – into the helicoid,
- Activated X-Pro1 focus peaking,
- FIRMLY held the chrome unit steady with my left hand while VERY gradually rotating the black unit until I saw the best focus-peaking across the image.
- Taped the helicoid’s chrome and black units into a single unit at this optimum setting (this join is visible in the opening photo),
- And from then on, I could shoot 110 scans without having to re-focus.
Scans from Four Favorite 110 Cameras
I’ve never owned a 110 SLR (like the ones from Pentax and Minolta). But before the digital age, the following 110 pocket-rockets were my everyday carry and favorite travel buddies. On one trip to Rome, I even fit three of ’em– plus enough film for a week– in a single belly bag. Talk about traveling light! They were the:
- Kodak Pocket Instamatic 60
- Canon 110ED 20
- Kodak Ektramax 110
- Minolta Pocket Autopak 470
NOTES: The following images were originally shot on Fujicolor 200, Kodak Gold 200 or Kodak Gold 400 (but back then, I sometimes didn’t keep notes about which). And through trial and error, I found that the best settings for all my scans were with the Switar open to f/8 (for depth of field), the camera set to ISO 800 (for lower noise), and its shutter speed set to whatever moved the camera’s on-screen exposure indicator to the middle (usually from ¼ to 1 second). Also, the following four subheads are linked to more info about each camera.
Kodak Pocket Instamatic 60
In 1972, Kodak introduced the world to 110 cartridge film and along with it, four high-spec “Pocket-Instamatic” cameras (with the “60” anchoring the top). To show the new film to its best advantage, the camera was superbly over-engineered (it even had a real “Ektra” lens).
I once test-shot the same sunset scene with a Pocket Instamatic 60 and Nikon FE SLR (both with Fujicolor 200 film). And though the 110 negatives were smaller, their camera captured subtle sunset colors better than the FE. But while the “60” required an expensive (and often, time hard-to-find) K-battery, one can now buy a refillable replacement online that uses drug-store button cells.
Here are four more 110 shots from the Rome trip mentioned earlier. In most of this article’s 110 scans, note the smooth tonalities and lack of excessive grain (even after up-scanning the 110 frames to APS-C size):


The photo at upper-left is part of Bernini’s Fountain of the Four Rivers, which is right outside the church featured in this 35mmc article in Rome’s Piazza Navona. And the charming elephant to its right is the base of Bernini’s Elephant and Obelisk sculpture in Rome’s Piazza Della Minerva.
But the photo at the lower-right (snapped near Rome’s Victor Emmanuel II Monument) proves that one can still get caught shooting “street” with a tiny camera! It was long ago, and the fake Roman centurion charged a Euro to appear in tourist snaps. I loved the guy beside him pointing down at me, and no doubt saying “Hey… THAT guy’s taking pictures without paying!” The “official” photographer on the lower-right was obviously admiring my 110 gear. And the centurion couldn’t be bothered.
Canon 110ED 20
Canon didn’t wait long after Kodak launched the 110 industry to answer with its 110ED and 110ED 20. Like Kodak’s Pocket Instamatic 60, these were rangefinder cameras. In addition to their active focusing aids, an electronic shutter offered stepless speeds from 1/1000 to 2 seconds, selectable apertures, and focus distances down to 2 feet. Canon’s lens was also a fast f/2.0– stiff competition for the Kodak Ektramax f/1.9 lens (described later):


The building at the upper-right is where I once wrote user manuals about 3Com Corp. network switches.
And note how well the camera (without flash) balanced foreground and background lighting in the lower-right photo! This life-size statue is named “Winitihooloo” after a legendary Native American from what eventually became Woburn, Massachusetts. The shot is of the original statue, carved in 1999 by artist Justin Gordon from a dead tree near Horn Pond. The statue subsequently suffered insect damage, wood rot and vandalism (twice). But it was reproduced and re-installed– to watch over an area still considered sacred to local tribes. (I’ll write another story about this special location… where my wife and I once almost died.)
Minolta Pocket Autopak 470
With a removable flash (a-la the Olympus XA), this is a highly pocketable, high-quality shooter. Its lens is also top-drawer, with a fast shutter capable of 1/1000 to 2 seconds and a built-in close-up adapter that focuses down to 20 inches (sometimes even 15):


One can use the camera’s lanyard (and the one on its equally capable predecessor, the 460TX) to measure the minimum focus distance for close-ups. I used it to shoot the hosta plant at the upper-left (focused on the bright leaf tip near front-center).
On the upper-right, the camera’s unusually fast shutter nicely froze three sources of potential blur: the hot-rod leaving a local car wash, my wife and I driving past, and my hand-holding the camera.
And I took the lower-left image to remember a beautiful old property that would soon be leveled to make room for four tasteless “McMansions.”
Kodak Ektramax 110
Fortunately for buyers, this superb camera looks like every other black-plastic pocket-brick. So if you successfully find one for sale, it’s often a great buy. And its sharp, fast, 25mm (f/1.9) four-element coated lens (with one aspheric plastic element) makes it especially suited to night/low-light photography. The only batteries it needs are two AAs for the flash (though flash didn’t work on either of my two versions).
I shot the night-cafe photo at the beginning of this article with an Ektramax propped against a street-lamp pole near Rome’s Termini train station. And to be honest, I think this little camera produced some of my most evocative images from any film format! Here are four favorites:

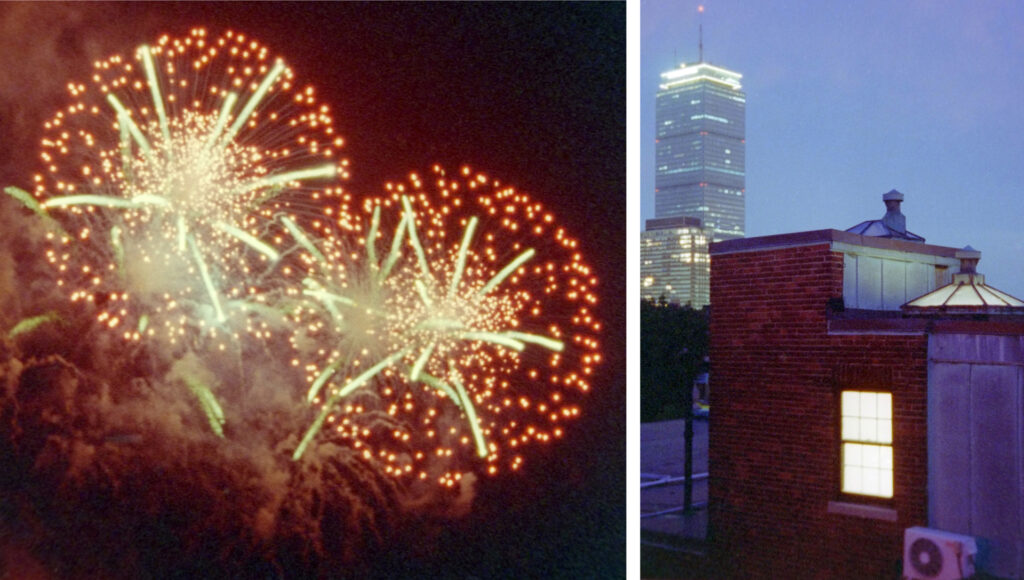
I think all of this article’s scans look remarkably good, for such tiny negatives blown up to APS-C size. But these four Ektramax images get to me. Especially, the final two, which I shot on a steamy July 4th evening in Boston’s Back Bay. A friend had invited us to a rooftop fireworks party. And his building was right across the street from the Charles River (and the barge launching the pyrotechnics.) This proximity allowed me to capture explosions, like the one above, that filled the 110 frame. (I only cropped the sides of the image to shave off some black space.)
And the “Blue Hour” scene to its right isn’t at street level. It’s the roof of the building beside us… with Boston’s iconic Prudential tower looming in the steamy background. I don’t remember seeing such lovely colors and shading with my naked eyes. And the image reminds me of the sometimes stark and lonely paintings of Edward Hopper (like his “Nighthawks,” “Corner Saloon“ and “City Roofs”). I really relate.
TIP: To get these steady night shots, I screwed the camera onto a vintage “C-clamp camera mount,” which I attached to the roof’s railing. (I’ll provide more info about it in a subsequent article.)
Some Thoughts
First, though my camera and lens were fairly securely mounted and I tripped the X-Pro1’s shutter with a release cable, I learned the value of shooting three or four copies of each scan. Even microscopic camera shake always guaranteed that one “take” would be very slightly sharper than the others. It was a pixel-peeper’s dream (or nightmare, depending on one’s point of view).
Digitizing these negatives also revealed a couple surprises:
- The labs that drugstores used back in the day appeared to enhance their final prints rather extremely before shipping them to customers. In many cases, to match the look of those prints, I would have had to dramatically boost the contrast and saturation of my scans. Two examples above were the Canon 110ED 20 sunset (which had much denser colors in the lab print) and the Minolta 470 tree (whose trunk and branches were completely black in its print). But in my scans, I kept processing gentle and consistent… and this article’s images probably reflect the way the lab prints should have looked in the first place.
- And while the labs developed 110 negatives as single long strips, they were a bit careless about cutting the strips into shorter lengths. More than once, if they cut through a frame even slightly, they didn’t print it. For instance, the Minolta 470 negative of a souped-up hot-rod was insignificantly sliced and I received no print. So I forgot I’d even taken it, and only rediscovered the “lost” image while examining the negatives under a loupe.
And finally, one may be tempted to discount subminiature cameras as “lesser” tools, with tiny, grainy negatives. But the negs are still analog… with resolutions theoretically limited only by the quality of the camera, lens, film, processing, scanning and printing. And 110/16mm negatives are only a hair smaller than the sensors in today’s Micro-Four-Thirds systems (17.3×13 vs 18×13.5 mm to be exact). So with today’s better film emulsions (including super-high-res B/W microfilm), 110 and 16mm cameras might easily capture better images now than was possible in their heyday.
More than a half-century after Kodak created the 110 format, these little cameras remain worthy analog companions for Micro-Four-Thirds shooters (or for anyone else). As you saw above, they can still be great vacation shooters. And one can easily digitize their negatives into 16MP APS-C files (or higher resolutions with different digital cameras).
For More Information
Both 110 and 16mm subminiature cameras are participating in today’s resurgence of interest in film. Here are some excellent places to learn more about these delightful little machines:
- This article offers detailed reviews of many popular 110 cameras– with lovely sample photos. (It also includes a sly nod to the 16mm realm.)
- Search 35mmc itself for author “Bob Janes” and you’ll find many excellent reviews of 110 cameras and film, articles about subminiature photography, and even a great 2021 overview of 16mm cameras. And 35mmc searches for “110” and “16mm” will reveal other authors as well!
- Two fiendish treasures for feeding one’s SGAS (Submini Gear-Acquisition Syndrome) are SubClub.org and SubMin.com.
Happy subminiature shooting!
–Dave Powell is a Westford, Mass. writer and avid amateur photographer.
Share this post:


Comments
Gary Smith on Adventures in C-Mount 110-Film Scanning
Comment posted: 08/08/2024
Comment posted: 08/08/2024
Comment posted: 08/08/2024
Comment posted: 08/08/2024
Tony Warren on Adventures in C-Mount 110-Film Scanning
Comment posted: 09/08/2024
I admire your digitising too. I use a rather bulky rig I made for all sizes from 5x4 to 16mm in all cases using a Sony A3000 and Micro Nikkor and tubes. DoF with that set up is tight enough to really test me so with the lens you are using here it must be microscopic. As to avoiding camera shake, using the DA I find the best approach.
Comment posted: 09/08/2024
Graham Orbell on Adventures in C-Mount 110-Film Scanning
Comment posted: 12/08/2024
They are little jewels.
Comment posted: 12/08/2024